Monday 25 January 2021

12cr2 installation steps on redhat 7 in vmware


network --hostonly adapter --public ip

internet --privnet

nat


set it automatically

________________________________________


cat /etc/oracle-release


uname -a


yum search oracle


yum -y install oracle-database-server-12cR2-preinstall.x86_64


check package information

 yum info oracle-database-server-12cR2-preinstall.x86_64


check kernel parameters


cat /etc/sysctl.conf


b. Check the security Limits:


cat /etc/security/limits.d/oracle-database-server-12cR2-preinstall.conf


check groups


 cat /etc/group


id oracle


usermod -g oinstall -G dba,oper,backupdba,racdba oracle

or


# /usr/sbin/groupadd -g 54321 oinstall

# /usr/sbin/groupadd -g 54322 dba

# /usr/sbin/groupadd -g 54323 oper

# /usr/sbin/groupadd -g 54324 backupdba

# /usr/sbin/groupadd -g 54325 dgdba

# /usr/sbin/groupadd -g 54326 kmdba

# /usr/sbin/groupadd -g 54327 asmdba

# /usr/sbin/groupadd -g 54328 asmoper

# /usr/sbin/groupadd -g 54329 asmadmin

# /usr/sbin/groupadd -g 54330 racdba


# /usr/sbin/useradd -u 54321 -g oinstall -G dba,oper,backupdba,dgdba,kmdba,asmdba,asmoper,asmadmin oracle

# passwd oracle


# cat /etc/oraInst.loc

inventory_loc=/u01/app/oraInventory

inst_group=oinstall


mkdir -p /u01/app/oraInventory

mkdir -p /u01/app/oracle/product/12.2.0.1/db_1

chown -R oracle:oinstall /u01

chmod -R 775 /u01


Set secure linux by editing the “/etc/selinux/config” file, making sure the SELINUX flag is set as follows


# cat /etc/selinux/config

SELINUX=permissive


Once the change is complete, restart the server or run the following command.


# setenforce Permissive


If we need to disable firewall in linux do the following:


# systemctl stop firewalld

# systemctl disable firewalld


Login as oracle user set the following entry in .bash_profile


# su – oracle

# cat .bash_profile


# .bash_profile


# Get the aliases and functions

if [ -f ~/.bashrc ]; then

. ~/.bashrc

fi


# User specific environment and startup programs


PATH=$PATH:$HOME/.local/bin:$HOME/bin

export PATH

export LC_ALL=C

if [ $USER = “oracle” ]; then

if [ $SHELL = “/bin/ksh” ]; then

ulimit -p 16384

ulimit -n 65536

else

ulimit -u 16384 -n 65536

fi

fi


Create an environment file for the database to be created with the following variables:


# cat /home/oracle/prod.env


# Oracle Settings

export TMP=/tmp

export TMPDIR=$TMP

export ORACLE_HOSTNAME=prod1.oracle.localdomain

export ORACLE_UNQNAME=PROD1

export ORACLE_BASE=/u01/app/oracle

export ORACLE_HOME=$ORACLE_BASE/product/12.2.0.1/db_1

export ORACLE_SID=PROD

export PATH=/usr/sbin:/usr/local/bin:$PATH

export PATH=$ORACLE_HOME/bin:$PATH

export LD_LIBRARY_PATH=$ORACLE_HOME/lib:/lib:/usr/lib

export CLASSPATH=$ORACLE_HOME/jlib:$ORACLE_HOME/rdbms/jlib


Oracle Installation:


Before starting the installation by “runInstaller” from the unzipped “linuxx64_12201_database.zip”, remember to set the display variable or “xhost +” as oracle user.


# su – oracle


#xhost +


Note:


Oracle as two options during the binary installation, first option is to install binary and create a database during the installation and the the second option is to install only the binaries. Here, we are going with the second option.


Step 1:


# pwd


/home/oracle


# unzip linuxx64_12201_database.zip


cd database


./runInstaller


Once, runInstaller is executed, the below GUI will started for Oracle 12cR2 Installation. In the first empty box provide your E-mail ID if you wish to receive updates from oracle, else uncheck and press “Next”.


id oracle


hostname


cat /etc/hosts


now use dbca to create database.


Monday 4 January 2021

capacity plan--Tablespace growth yearly base


Tablespace growth yearly


SQL>select to_char(CREATION_TIME,'RRRR') year, to_char(CREATION_TIME,'MM') month, round(sum(bytes)/1024/1024/1024) GB

from   v$datafile

group by  to_char(CREATION_TIME,'RRRR'),   to_char(CREATION_TIME,'MM')

order by   1, 2;


YEAR MO         GB

---- -- ----------

2004 10         14

2004 11         66


montly growth

select
decode
(
grouping_id (to_char(creation_time, 'YYYY MM'))
, 1
, 'Total'
, to_char(creation_time, 'YYYY MM')
) mnth
, sum(bytes)/1024/1024/1024 growth_gb
from v$datafile
where creation_time > SYSDATE - 365
group by rollup (to_char(creation_time, 'YYYY MM'));


*******************************************************


set linesize 200 pagesize 100 colsep "," echo off feedback off timing off
column tablespace_name format a20
column avg_growth_per_day_gb format 9999.99 heading "AVG GROWTH|PER DAY GB"
column projected_growth_for_3mths_gb format 9999.99 heading "PROJECTED|GROWTH|FOR 3 MONTHS|GB"
column projected_growth_for_6mths_gb format 9999.99 heading "PROJECTED|GROWTH|FOR 6 MONTHS|GB"
column projected_growth_for_1yr_gb format 9999.99 heading "PROJECTED|GROWTH|FOR ONE YEAR|GB"
column msg format a15 heading "ACTION|TO BE TAKEN"
with t1 as (
 select ss.run_time,ts.name,round(su.tablespace_size*dt.block_size/1024/1024/1024,2) alloc_size_gb,
 round(su.tablespace_usedsize*dt.block_size/1024/1024/1024,2) used_size_gb
 from
 dba_hist_tbspc_space_usage su,
 (select trunc(BEGIN_INTERVAL_TIME) run_time,max(snap_id) snap_id from dba_hist_snapshot
 group by trunc(BEGIN_INTERVAL_TIME) ) ss,
 v$tablespace ts,
 dba_tablespaces dt
 where su.snap_id = ss.snap_id
 and su.tablespace_id = ts.ts#
 and ts.name NOT LIKE '%TEMP%'
 and ts.name NOT LIKE '%UNDO%'
 and ts.name = dt.tablespace_name order by 2,1),
t2 as (
 select e.run_time,e.name,e.used_size_gb,e.used_size_gb - b.used_size_gb growth
 from t1 e, t1 b
 where e.name = b.name and e.run_time = b.run_time +1),
t3 as (
select --fre.tablespace_name, fre.alloc,fre.used,
tsz.name,
tsz.alloc_size_gb,tsz.used_size_gb,ave.avg_growth_per_day_gb,ave.avg_growth_per_day_gb*90 projected_growth_for_3mths_gb 
from
(select name,max(alloc_size_gb) alloc_size_gb, max(used_size_gb) used_size_gb from t1 group by name) tsz,
(select name,round(avg(growth),2) avg_growth_per_day_gb from t2 group by name) ave 
 where tsz.name = ave.name)
select t4.tablespace_name,t4.alloc alloc_sz_gb,t4.used used_sz_gb,
 --t3.alloc_size_gb,t3.used_size_gb,
 t3.avg_growth_per_day_gb,t3.projected_growth_for_3mths_gb,t4.free free_sz_gb,
 case when t4.free < nvl(projected_growth_for_3mths_gb,0) then 'ADD SPACE' end MSG, 
 projected_growth_for_3mths_gb*2 projected_growth_for_6mths_gb , projected_growth_for_3mths_gb*4 projected_growth_for_1yr_gb
 from t3,
 (select a.tablespace_name,
 round(a.bytes/1024/1024/1024,2) alloc,
 round(b.bytes/1024/1024/1024,2) used,
 round(c.bytes/1024/1024/1024,2) free
from sys.sm$ts_avail a,
 sys.sm$ts_used b,
 sys.sm$ts_free c
where a.tablespace_name = b.tablespace_name(+)
 and a.tablespace_name = c.tablespace_name(+)) t4
where t4.tablespace_name = t3.name(+)
 order by 1;
spool capacity_planning.csv
/
spool off


Saturday 2 January 2021

19c important features

19c features 


Automatic flashback in standby following primary database flashback


DBA's often kill the blocking sessions and from 19c (not sure which patch set) 

we have new parameter called MAX_IDLE_BLOCKER_TIME parameter which helps to specifies the maximum number of minutes that a blocking session can be idle. After that point, the session is automatically terminated.


This parameter differs from the MAX_IDLE_TIME parameter in that MAX_IDLE_TIME applies to all sessions (blocking and non-blocking), whereas MAX_IDLE_BLOCKING_TIME applies only to blocking sessions. Therefore, in order for MAX_IDLE_BLOCKING_TIME to be effective, its limit must be less than the MAX_IDLE_TIME limit.


And the MAX_IDLE_TIME limit parameter is available from 12.2.0.1 version.


*******************************************************************************************

Configuring Fast-Start Failover in Observe-only Mode

Starting 19c , dataguard broker can be put in observe only mode instead performing FSFO. This will help to test the broker conditions that have met. There will be entries in the broker log or observer log indicating Fast start failover would have been initiated.


DGMGRL> ENABLE FAST_START FAILOVER OBSERVE ONLY;


*********************************************************************************************


Automatic flashback in standby following primary database flashback

******************************************************************************************

 EZConnect Enhancements

EZConnect is something very useful to make fast connection calls without requiring a TNS. Problem is that, until now, if you want to use some value pairs likes SDU, RETRY_COUNT, CONNECT_TIMEOUT, this wasn't possible and you would end-up using TNS. Now in 19c you will be able to write something like:


sqlplus user/pwd@//DB:1521/host?connect_timeout=100&transport_connect_timeout=10&retry_count=3

********************************************************************************************

How does DML redirect to standby works


In Oracle 19c, one can submit the DML to readonly standby database. the internals of the database detect a dml on standby and redirect that dml to primary apply it on primary and apply to standby back. However this require careful consideration of redo generation and identify the potential dml's or occasional dml;s that can go to standby.


The DML Redirection process breaks down in 5 steps:


The Client issues a DML against the read-only Standby Database

The standby notices it is DML and sends this DML towards the primary database using an internal Db-link

The primary executes the DML (which then generates redo)

This redo is a normal redo stream and together with the normal redo stream this is sent to the standby database

The standby database applies the received redo stream and releases the lock on the session so the session can see the result.

So consider before you put this feature in place and understand bandwidth and ideal candidates for DMLs that can run on standby.


*****************************************************************

 Auto upgrade utility


Autoupgrade is compatible with 12.2 and 18.5 and you need to download the kit from 2485457.1


Autoupgrade.jar is available default in 19c


How this works


Prevent Issues : Analyze and Fixup Modes


java -jar autoupgrade.jar -config config.txt -mode analyze


java -jar autoupgrade.jar -config config.txt -mode fixups


Simplifying Upgrade: Deploy and upgrade


java -jar autoupgrade.jar -config config.txt -mode deploy/upgrade


+++++++++++++++++++++++++++++++++++++


 DBCA Enhancements

19c, DBCA facilitates duplication of db with new “CreateDuplicateDB”


Requires easy connection string so that it duplicates the target db to wherever running .


start & stop the database in postgresql

 -bash-4.2$ service postgresql

The service command supports only basic LSB actions (start, stop, restart, try-restart, reload, force-reload, status). For other actions, please try to use systemctl.

-bash-4.2$

-bash-4.2$ service postgresql status

Redirecting to /bin/systemctl status postgresql.service

● postgresql.service - PostgreSQL database server

   Loaded: loaded (/usr/lib/systemd/system/postgresql.service; disabled; vendor preset: disabled)

   Active: inactive (dead)

-bash-4.2$ service postgresql stop

Redirecting to /bin/systemctl stop postgresql.service

==== AUTHENTICATING FOR org.freedesktop.systemd1.manage-units ===

Authentication is required to manage system services or units.

Authenticating as: postgre

Password:

==== AUTHENTICATION COMPLETE ===

-bash-4.2$

-bash-4.2$

-bash-4.2$ service postgresql status

Redirecting to /bin/systemctl status postgresql.service

● postgresql.service - PostgreSQL database server

   Loaded: loaded (/usr/lib/systemd/system/postgresql.service; disabled; vendor preset: disabled)

   Active: inactive (dead)


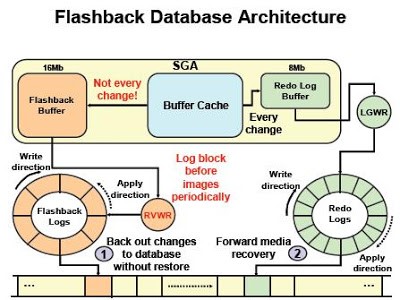
Flashback database detailed

 The maximum allowed memory for the flashback buffer is 16 MB. We don’t have direct control on its size. The flashback buffer size depends on the size of the current redo log buffer that is controlled by Oracle. Starting at 10g R2, the log buffer size cannot be controlled manually by setting the initialization parameter LOG_BUFFER.


flashback

To find current size of the flashback buffer, we can use the following query:

SQL> SELECT * FROM v$sgastat WHERE NAME = 'flashback generation buff';


1)Flashback Database Feature introduced in Oracle 10g used for Flashback the database to "point in time (SCN)" in the Past. 

2)Flashback creates Flashback Logs to write Flashback Data which is stored at “Recovery_file_dest” and managed by “Recovery_file_dest_size”. 

RVWR is the background Process writes the Flashback data. 

3)The parameter “DB_flashback_retention_Target” Specifies upper limit on how far back in time database may be flashed back. 

We have 2 types of Restore points namely Normal & Guaranteed Restore points (GRP). 

If we chose GRP, then the flashback Logs and Archive logs are retained until GRP dropped.


Content of Flashback Log Vs Redo Logs


As per Oracle Document, “Redo log files are filled with redo records. A redo record, also called a redo entry, is made up of a group of change vectors, each of which is a description of a change made to a single block in the database. Redo entries record data that you can use to reconstruct all changes made to the database, including the undo segments. Therefore, the redo log also protects rollback data. When you recover the database using redo data, the database reads the change vectors in the redo records and applies the changes to the relevant blocks”.


The Undo Data is at transaction level and Flashback Data is “Undo Data” at Block Level. Also, Flashback Log Contains the DDL Operations which is not captured in Undo data. Now you may understand why… DDL`s executed at Block Level


Redo Log file consist of all changes done along with Undo Segments. But The Past-Image of the Block is not recorded anywhere and that’s what Flashback Log


 The Mechanism is similar as Log Buffer which writes Redo Changes to Redo Logs through LGWR Process and Flashback Buffer write Past-Image data to Flashback Logs through RVWR Proces


It is by the way RVWR Process writes the data Asynchronously into Flashback Log. LGWR data is synchronously written. Because, Redo Log buffer (LGWR) updated with Every Change (Transaction Level). Rather, Flashback Buffer (RVWR) not updated for every change (Block Level).


Flashback log vs. Redo log


1) Flashback logs and redo log files are similar in nature


2) LGWR writes to redo log files


3) RVWR writes to flashback logs


3) Redolog files are archived but flashback logs are reused


4) Flashback log file sizes are exactly or equal to the size of the redo buffer, unlike the redo log files (custom size)


5) Redo log files are used for rollforward the changes, but flashback logs are rollbacking the changes


Flashback log vs. undo

***********************


1) Undo data is at transaction level


2) Flashback log covers the undo data at the block level


3) Undo does not record ddl operations where the flashback log does


4) UNDO data is used to backward changes at the transaction level while flashback logs are used to backward changes at the database level


We usually have to flashback/Rebuild the Standby database during primary Flashback. Since Oracle 19c, a DBA can put the standby database in MOUNT mode with no managed recovery (or Read Only) and then flash back the primary database. When you restart the MRP after closing the physical standby, the recovery process automatically flashes back the standby database and continues to apply the new branch of redo.


Ref : http://neeraj-dba.blogspot.com/2011/07/flashback-features-in-oracle.html

Featured post

Postgres commads

 [oracle@Tesdb ~]$ systemctl status postgresql-15 ● postgresql-15.service - PostgreSQL 15 database server    Loaded: loaded (/usr/lib/system...